Some websites have forms that will not allow users to input text into form fields unless they match a certain
pattern. For example, a phone number in the United States and Canada is usually three digits (the area code, or the NPA), followed by three
more digits (what people in the telecom world call the central office code, or an NXX), followed by
four more digits (the
line number). Here is an example:
Area Code
Central Office Code
Line Number
416
555
1212
The breakdown of the phone number 416-555-1212
While we want users to be able to input just the numbers into a form, it would be nice to be able to format the
input with dashes as users type so they can keep track of which digits have already been entered. This is especially
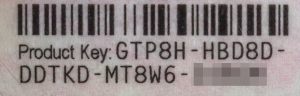
nice when users are given an even larger set of characters to enter, such as a credit card, or a Windows Activation
License key:
An example of a Windows Product Key. Note how it is divided into groups of five characters with dashes
in between to make it easier for the user to type in.
To deal with this problem, there are many input masking JavaScript libraries that will mask the input as the
user types. The problem is that a lot of them have quirks that make them hard for all users, especially those with
disabilities. I have spent a lot of time playing with input masking, and I have found that in order for an input
mask to be truly accessible, it should have the following features:
Visually only masking: The masking should only affect how the data input looks visually. For
example, if spaces appear in the masked data, it's just for presentational purposes; the data submitted to the
server in the end should not have the spaces in it.
Flexible input of data: If the input field has data in it, the user should be able to move the
cursor inside the input field with a keyboard or mouse and edit the data anywhere the cursor can move (i.e. not
just at the end of the data). They should also be able to paste data anywhere into the field as well as select
multiple characters that can be replaced or erased. It should have the same behavior as an unmasked input
field.
Keyboard friendly: Keyboard users should be able to access the masked field with the TAB key,
just like an unmasked input field.
Screen reader friendly: Screen reader users should be able to use the masked input field
just like an unmasked input field.
Screen reader alerts: If the user pauses while typing the data, screen readers will announce
all the characters in the input field individually instead of reading the data as a word. This
is because the data used in masking (e.g. phone numbers, credit cards, product keys, etc.) are not words, and it
is better UX to have the data read out character by character.
When I searched for "Accessible input mask" in Google in October 2023, the following three libraries were the most
commonly cited, so I tested for these features:
Yes. (although the demo page doesn't use proper labels).
No
No, typing an invalid character (e.g. a letter in a numeric field) causes the cursor to move up one
character.
No
Since none of them really fit the bill (and I do think that these features are 100% needed to be truly accessible), I
created Enable's Input Masking library. You can test it out with a screen reader and keyboard yourself.
Example 1: Static Input Masking
Code Walkthrough of the Above Example
Below is the HTML of the above example. Use the dropdown to highlight each of the individual steps that make the example accessible.
☜ Scroll to read full source ☞
How to Set the data-mask Attribute
For the phone number field, you will note it is 999-999-9999. The 9 characters are what we
call input characters and represent where inputted data (in this case digits) should appear. The
dash characters are what we call format characters and will be automatically put in the visual
field as the user types in the numbers. Users don't need to add them manually.
Note that spaces, dashes, and round brackets (i.e. " ", "-", "(" and
")")can be used as format characters. Possible input characters are:
"_" (underscore)
Represents any character that isn't a format character.
"U"
Any non-numeric character that we want to change to uppercase, if possible.
"C"
Any character that we want to change to uppercase, if possible.
"X"
Any letter
"9"
Any number
How Does the Library Work?
If you just want to implement input masking and don't care how it works, just skip this section. If you are
interested in the technical details of how this all works, click the button below.
I want to read the gory technical details.
How the DOM and CSS are Set Up.
We don't change the data inside the input field. Instead, we create an absolutely positioned HTML block
(which we call a facade) that, using a higher z-index than the input field, sits on top of it. This contains
the formatted input field data and covers the input field so it is no longer visible to the user (We also
make the input field's text transparent and ensure the facade and the input field are the same pixel size).
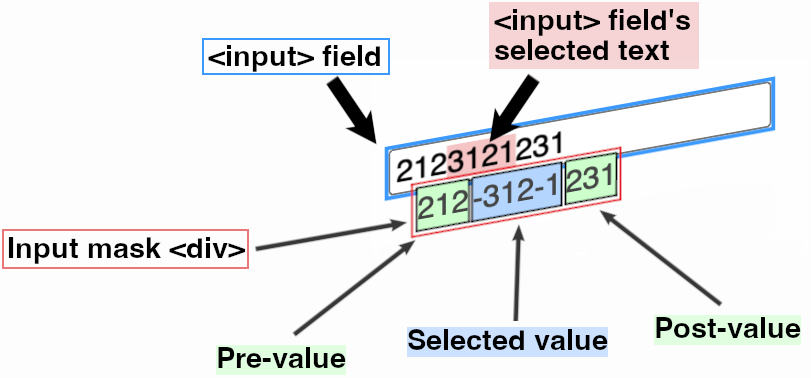
A 3D representation of the DOM of the input mask component.
The diagram above shows that the input field is stacked underneath a facade that contains the visually formatted input with the data mask applied.
The input field contains the phone number 212-312-1231, without dashes, and the number 3121, which is in the middle of the phone number, is selected (presumably because the user wants to cut, copy, or erase it).
The facade has the same phone number as the input field but is formatted with dashes in the standard places for a North American phone number.
The mask's visual data is divided into three areas: the text before the selected area (212), the selected text (-3121), and the text after the selected area (231).
This was done so we can mimic the input field's blinking cursor as well as show what data has been selected by a mouse (more on this below).
Keyboard UX
The input field is keyboard accessible, and keyboard users can type in data just as they normally would.
Keyboard focus, when applied to the input field, is visible since the input field and the facade are the same size.
When the user types into the input field, JavaScript updates the facade with the same data, except it has format information.
The user can even select text (via the usual SHIFT+arrow keys), and the equivalent text is selected in the input field underneath.
Data can also be cut, copied, and pasted from the input field, and the facade will be appropriately updated.
Mouse UX
For mouse users, when they click on what they think is the input field, they are actually clicking on the facade stacked on top.
JavaScript figures out where in the input data they are clicking and ensures the cursor in the input field stacked underneath is placed in the right area.
Because all mouse events are basically passed on to the input field underneath, the user can select text with a mouse, and the appropriate text is selected in the input field, so that it is updated correctly.
Screen Reader UX
If the user stops typing for a while, the "formatted value" of the input field is announced (i.e. the input field's value is announced character by character).
This is done via an ARIA live region, which is described in the code walkthrough above.
So, instead of the screen reader reading the input field as a large integer (in this case, "two billion one hundred twenty-three million one hundred twenty-one thousand two hundred thirty-one"),
it will read it as the phone number one digit at a time (i.e. two one two three one two one two three one). This makes it easy for screen reader users to know what they just typed in.
Example 2: Dynamic Masking of Credit Card Fields
The credit card fields are a little different. At the time of this writing, the format characters (i.e. the spaces) are
put in different places depending on whether it's an American Express (a.k.a. AMEX) card or another credit card type:
American Express
Others
9999 999999 99999
9999 9999 9999 9999
The spacing of a American Express cards vs their competitors
Luckily, we know what American Express cards always begin with the digits 34, so we just ensure that
when the user inputs a string beginning with 34 we change the data-mask attribute from
9999 9999 9999 9999 (the mask of the non-American Express credit cards) to
9999 999999 99999 (the format for American Express cards). Below is an example of this in action.
Code Walkthrough of the Above Example
Below is the HTML of the above example. Use the dropdown to highlight each of the individual steps that make the example accessible.
☜ Scroll to read full source ☞
Installation Instructions
You can load this JavaScript library into your application in several ways:
// import the JS module
import inputMask from '~enable-a11y/js/modules/input-mask';

// import the CSS for the module
import '~enable-a11y/css/input-mask';

// How to initialize the inputMask library
inputMask.init();
Alternatively, if you are using LESS you can include the styles in your project's CSS using:
☜ Scroll to read full source ☞
@import '~enable-a11y/css/input-mask';
(If you are using it in your CSS, you will have to add the .css suffix)
Using NPM/Webpack to Load Modules Using CommonJS Syntax
If you want to load the module as a native ES6 module, copy js/modules/input-mask.js
, and css/input-mask.css
from the repo and put them
in the appropriate directories in your project (all JS files must be in the same directory).

 Yes.
Yes.